 |
|||||||||||||||||||||||||||
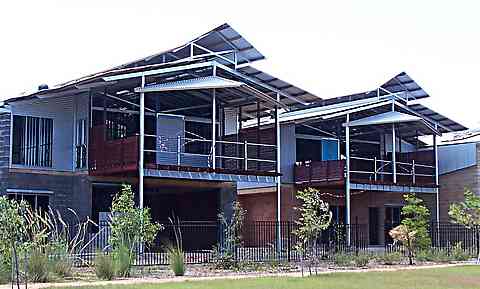
More Steel RoofsSteel roofs are all the go where I live in tropical Northern Australia and the next few shots are typical of good modern tropical roof design.
I have said that I am more of a traditionalist when it comes to roof design, full fascias and barge boards. Now I am not so sure, the more I see of designs like this I can appreciate the clean lines and their enormous power to shift those zones of dead air out of the roof space.
For three months of the year our power bill just about doubles. That's right, we switch on our air conditioners. These houses are designed for low energy consumption, they will be cool without the use of air conditioners. I am hoping to be able to go back and take some more photos when they are nearly finished. Looking at the design and the quality of the construction so far I think they will be stunning. There will be interesting things going on in terms of a photo voltaic solar system. The veranda decks are worth a separate page also.
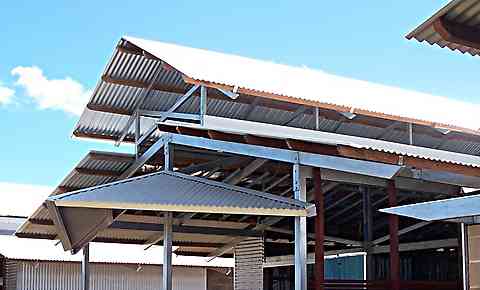
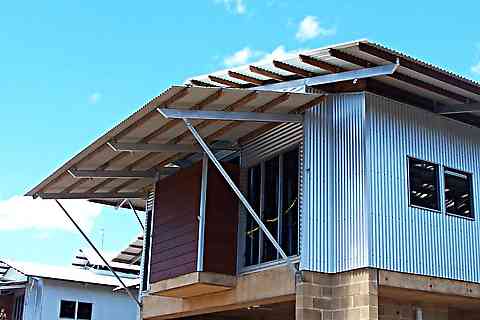
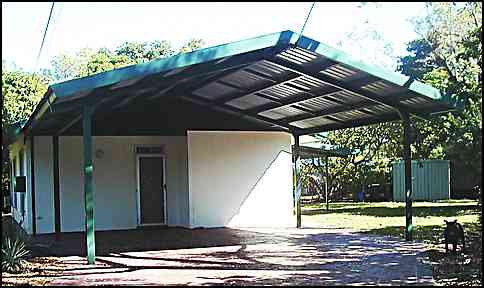
Here's another view of the same houses. The ground floor Has 200 thick reinforced concrete blockwork with a suspended concrete slab floor. Upper walls are steel frames clad externally with Zincalume Custom Orb. Roof steelwork is mostly hot dipped galvanized with hardwood purlins and Zincalume Custom Orb. roof sheeting. And now for something for the rest of usHere is one of two steel roofs that I built onto a house we owned a few years ago. This one a double carport. We were intending to rent the house and eventually to sell it, so I was going for the largest area for the least amount of money.
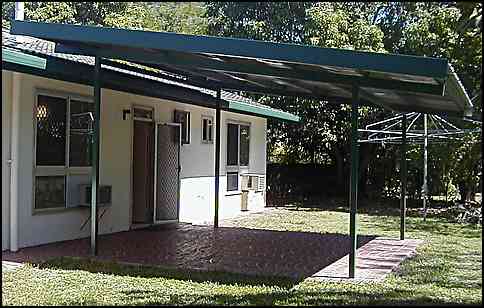
This carport is of all steel construction using RHS sections for the three portal frames and two tie beams. "Z" purlins bolted to cleats that are welded on top or the portals. Sheeted with a sheet metal profile called "Trimdek Hi-Ten". The actual roof purlins and sheeting are common materials used in large industrial buildings and so they are fairly cheap. Nothing in timber can compete for price and covering the same spans. The columns were cast into 600 dia. augured foundation holes. Cut off to height after the concrete had set. What you can see on the end of the roof (painted green) are the two barge flashings. These are made to order out of pressed metal. They are optional, not required structurally but I like the traditional look.
Here is another shot of the same roof. (I strip my photos down to a bare minimum to make them load faster, so I am sorry for the crappy look). You can see a gusset made out of RHS off cut welded to stiffen up the join between the column and the main roof beam. The RHS tie beam is welded to it. At the same time we built this verandah roof at the back of the house. This provided an outside sitting area that is common where we live.
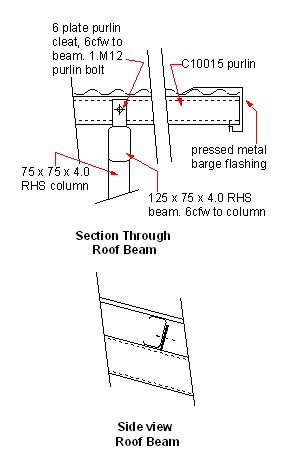
Sketches of the same structure
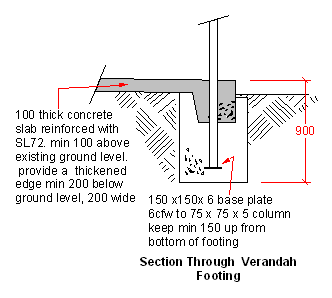
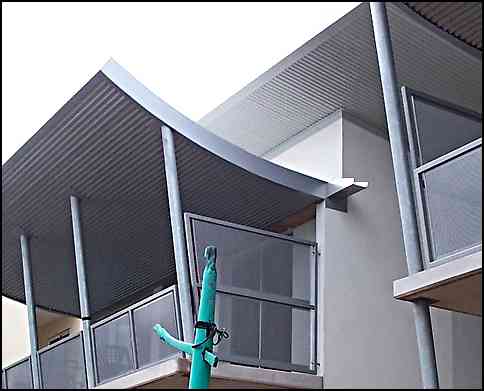
RHS is short for Rectangular Hollow Section. The roof cladding is corrugated Iron. 6cfw means a complete 6mm fillet weld around the joint. Below I have thrown in a typical detail of the concrete footing we use for this sort of job. I always prefer casting the column into the concrete. The job is over and done with in one operation. It is not hard to put a datum (level mark) on each column and then cut them off to final level. I have seen this sort of small job done with steel plates cast into the footings, and then the columns are welded on after. This seems a lot harder to do, plus you then have the weld to keep corrosion away from. This is I guess a fairly hot house to live in, with it's low set concrete walls and tile roof. They soak up the heat during the day, and hold it well into the evening. The windows are basic (it is an ex government house), and rather than do any major renovations, we added this small verandah to give an outside sitting area. The design feature of keeping it not connected to the house is one I use a lot. In this case a continuation of main house roof was out of the question, as it would be far too low. In cases where I could connect it, I very rarely do. The feature of the air gap to let the hot air out at the top is essential to keeping cool in the tropics. The fact that the roof is higher gives a lighter more roomy feel to verandahs like this also. With the gutter on the main roof, surprisingly little rain gets into the verandah area. We put Sisalation (silver reflective foil to reduce heat) under the roof sheeting, and after this shot was taken we lined the underside with 6mm cement sheets, and added a couple of fans. We power wire brushed all the steelwork, painted cold galv paint on the welds, etch primer over the lot and two coats of full gloss enamel paint. Two of us, built these two roofs in about 10 days. All the steelwork was done on site and we hired a welder (man and machine) for about 7 hours site welding. (he made the cleats for us off site). We got sub-contractors in to do the stamped concrete slabs. Curved roofsHere is a roof that is a little more upmarket, on a couple of apartments I had a hand in designing and building in 2004.
The roofs that you see here use the same materials as before almost. RHS steel beams welded to steel columns. In this case the "C" purlins fit inside the beams to keep the overall thickness down. (we wanted to hide the beams). The beams were rolled to the curve by the steel supplier. The corrugated roof sheeting was of a type that can be rolled to a curve, this one is about 6M radius. Standard corrugated roofing will lie to a large curve, that is spring curving, sharper curves have to be rolled, in a more ductile material. What we used on the main roof above which was about 50M radius. The underside of the roofs was also lined with corrugated roof sheeting material. You can see that there is a box gutter (stainless steel) against the wall with its end open to run the water straight out. Both ends of it are open as I am a bit paranoid about box gutters. They never seem to be made big enough and fill up with debris over the years and cause heaps of problems. Luckily they are rarely seen over the living space in residential roofs, but in commercial roofs they are common. All the steelwork was hot dip galvanised after fabrication, as the building is overlooking the sea.
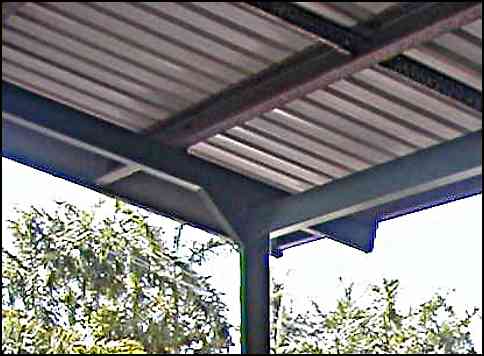
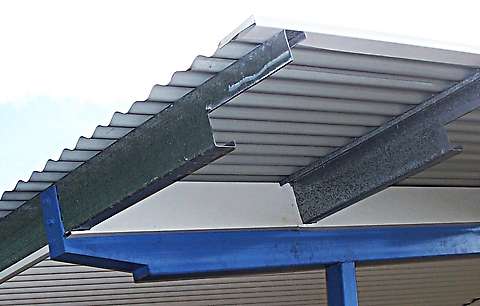
Here's a roof that has sloping rafter beams on 75 sq. RHS columns. The end purlin is a "C" section and is used as the fascia. The purlins farther up the roof are "Z" section. Again there are no barge flashings, which is getting quite common. Instead a "U" trim has been fitted over the edge of the sheeting and the exposed ends of the purlins have been cut back, to stop water lodging in the purlin. I have never seen them cut back in this fashion before. Usually they are cut on a slope. Some architect trying to be different. The ceiling is lined with corrugated sheets also, and the white stuff above the blue beam is a neat flashing to blank off what would otherwise be an opening that would let vermin into the roof. Vermin proofing is mandatory under the BCA.
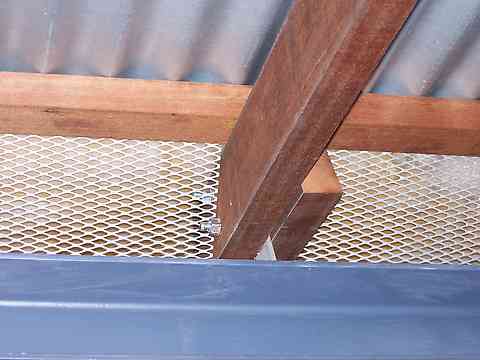
Here's how we did the vermin proofing on a roof that had a "Whirlybird" extractor. Fresh air entering at the eaves through the expanded metal mesh, and leaving at the top. You can also see the splice of the two rafters occurs at the cleat, which is sandwiched between them. Not found it yet? Try this FAST SITE SEARCH or the whole web |
Hire Equipment  Furniture Fittings - Architectural Hardware - Electronic Locking Systems - Technical Hardware BuilderBill sponsorship Quick Illustrated Roofing Glossary Pages.Types of roofsRoof Features Roof Framing Roof Trusses Roof Coverings In Depth Roofing Articles
|
||||||||||||||||||||||||||
|
|
|||||||||||||||||||||||||||
|
Please Note! The information on this site is offered as a guide only! When we are talking about areas where building regulations or safety regulations could exist,the information here could be wrong for your area. It could be out of date! Regulations breed faster than rabbits! You must check your own local conditions. Copyright © Bill Bradley 2007-2012. All rights reserved. |
|||||||||||||||||||||||||||
