 |
||||||||||||
Raft slab formwork,structural on the ground slabs
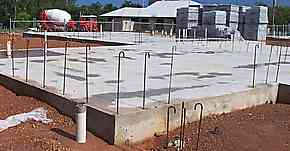
One of the quickest and easiest ways to get a floor and foundation combined. Commonly called a raft slab. They are ideal for fairly flat sites. There is a section of the BCA that states that slabs on the ground like these must be a minimum of 150 above natural ground level, and further, that any wet area with a floor waste (bathroom etc.) should be a minimum of 250 above natural ground level. So as a result of this most of these slabs are between 200 and 300 above ground. Add to this the amount that that the engineer requires the slab edge foundations (reverse kerbs) and the formwork is usually around 600 deep. No big deal to form up but there are a few points to note.
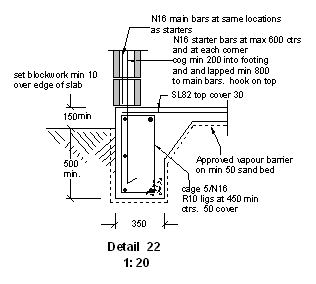
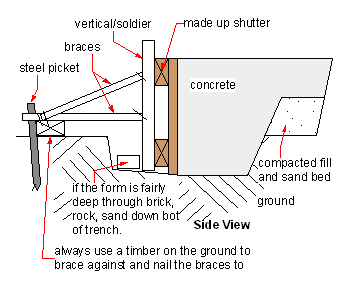
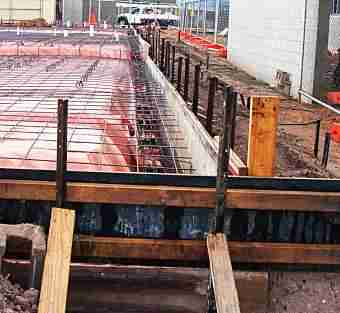
The sketch is a detail of an actual job that I have done in the past. Your situation could be entirely different. In fact they could be different for me the next time I do a drawing. It could be a different terrain category, supporting a different structure etc. Where I am we are lucky in that we don't have areas of bad ground for foundation material, where you are you may have to have the actual slab engineered to take into account reactive soils etc. You may have to use the so called waffle pad type foundations, but the edge formwork should be similar to what I show here. A few years ago we were able to drop the starter bars (the reo-rebar that connects the slab to the masonry, ) into the wet concrete during the pour. However some guys were seen to be cutting off the cogs at the bottom of the bars, when the concrete was going off on them. Now it is mandatory to have them all tied in position before the pour begins. Note! the hooks on the starter bars are not a structural requirement, they are there for safety. I always like getting as much of the starter bars and bathroom set downs etc. ready before the concrete is poured. If you leave things like that until after, it is usually done in a rush, and accuracy goes overboard. The photo labelled "how not to do it" on the right has been included as a warning. I hung around one morning taking photos of the concrete pour for this slab. The boss that had set all this formwork up, had a string line on every shutter. And boy did he need it! Every time that the vibrator got going the form would bulge out and the guy would push and tap with his hammer to get it straight again. What an absolute idiot. What was happening, was that the braces were slipping on the steel pickets. All he had to do was use the pickets temporarily and drop vertical timbers down nailed to the shutter and then nail the braces to them. As in the sketch above. Not found it yet? Try this FAST SITE SEARCH or the whole web |
Hire Equipment  Furniture Fittings - Architectural Hardware - Electronic Locking Systems - Technical Hardware BuilderBill sponsorship Other Formwork Pages.
The guy that did the "how not to do it" formwork at the bottom of this page, in spite of him being in the building game over 40 years, had a bad habit that also had me biting my tongue to keep from making a remark to put him straight. Whenever he used the dumpy level he gripped it firmly with both hands or even rested his free hand on the tripod. This is a definite NO NO. Once the instrument is set up correctly, the only time that you touch it is with a light touch with just enough to make the adjustment to the focus or swing. I was taught to keep the free hand behind my back, to resist that temptation to put weight where it is not needed. Se my leveling page for more on this. |
|||||||||||
|
|
||||||||||||
|
Please Note! The information on this site is offered as a guide only! When we are talking about areas where building regulations or safety regulations could exist,the information here could be wrong for your area. It could be out of date! Regulations breed faster than rabbits! You must check your own local conditions. Copyright © Bill Bradley 2007-2012. All rights reserved. |
||||||||||||


