 |
||||||
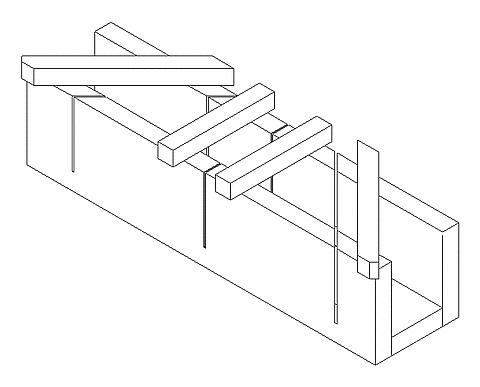
A Home Made Miter Box.Here is a miter box that has been around for centuries. Master cabinet makers used them to create works of art for the crowned heads of Europe. Yet the only people who seem to use them now are plasterboard fixers when they are cutting their cornices. (Apart from myself and maybe you of course :-) I have had a couple of those hand miter frame things, with the long back saw and adjustable swing on the saw. The cheap ones are no good and for the price of a good one, you can now get a power one.
I always make these myself, wouldn't dream of buying one. Always made out of scrap timber, see my bit about making one for a power saw. They can be nailed or screwed together. The little bits across the top maybe using very fine nails to fix them. If you use scrap ply for the top it is ideal as it does not split. The three pieces are fixed together in long lengths, when the whole thing is made, mark out your 45 deg. cuts. maybe even a 90 deg. one. Now you make the guide cuts with the same saw that you will use for the rest of the work. If it is sharp you will have little trouble. I usually us my Sanvik panel saw, a 22" with 9 teeth per inch. If you are cutting small stuff, make the miter box small also, suit the job. In this case you also use a smaller saw. After you have been using it a while, the guide cuts start wearing and your cuts start getting sloppy. Throw it away and make another one in less time than it takes to go to the store. Let's say that you want to make an eight sided picture frame. The angle
at the joints is not a true miter, which is 45 deg. in this case
the angle will be half that at 22 1/2 deg. I usually only make up these now when
I have a few cuts to do that I can't do with my Here is a note that I got from Gid in the US. I enjoyed your homemade miter box instructions, and have a couple of little suggestions: Instead of just scrapping it when the slot gets worn, why not make several guide slots for 45 and 90-degree? I usually cut several,about an inch apart, and when one gets worn out I stick a dab of caulk in it to remind me it's dead. Also, since I usually make these out of whatever 1x4 scrap is handy, sometimes the glued-up product isn't exactly all 90-degree angles, so I sometimes glue pieces of the same scrap between the tops of the "side rails" to improve the geometry. It means I have to slide the workpiece in from the end, but it gives more accurate cuts. Again, thanks for the handy website. It's good that we old timers pass on these tips whenever we can. Things I picked up from my dad 50 years ago still come in handy today. Thanks for that Gid, you sound like myself in this respect, rather improvise and use what we have on hand than buy the latest must have gadget. leave miter box and back to hand tools Not found it yet? Try this FAST SITE SEARCH or the whole web |
Hire Equipment  Furniture Fittings - Architectural Hardware - Electronic Locking Systems - Technical Hardware BuilderBill sponsorship Other Carpentry and joinery related pages.
|
|||||
|
some text or whatever.
|
||||||
|
Please Note! The information on this site is offered as a guide only! When we are talking about areas where building regulations or safety regulations could exist,the information here could be wrong for your area. It could be out of date! Regulations breed faster than rabbits! You must check your own local conditions. Copyright © Bill Bradley 2007-2012. All rights reserved. |
||||||
