Formwork For Concrete Stairs
Stair Formwork, A Single Flight
The stair formwork from an actual job that I did in 2004. A couple
of flights of outdoor concrete stairs, up to two first floor apartments. I didn't take any photos at the time, but here is a detail off the drawing, showing the rebar etc.
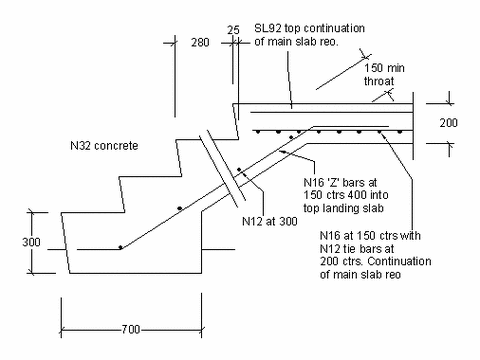 |
| Stair formwork - Actual detail lifted of the drawing, for the flight of stairs below. |
As
with all stair formwork, indeed all stairs in general, you can see the toe space. The stair is
supported by the landing at the top, which is in turn a continuation of
the main floor slab. The stair and landing were poured at the same time as the main floor slab.
- The
throat is the thickness of the stair slab that holds up the stair. The tread
triangles above it are just dead weight as far the the structural
engineer is concerned. It is critical to get the throat or
slab as it is sometimes called, right.
- The
reinforcing bars are placed in the bottom of the slab with the correct
amount of cover as detailed by the engineer. The N12
and N16 refers to the type and size of the bar. In
this
case it is a general purpose deformed bar with a yield stress of 500
MPa.
- SL92 refers to the type of reinforcing mesh to
the top of the slab.
- N32 refers to the strength of
the concrete.
These
are just brief details that give the guys on the job what materials to
use. In another part of the drawing references are made to
the
various Australian Standards that govern various parts of the work.
For example there is a standards for concrete, for rebar, for
formwork, there are sections in the BCA governing stairs,
handrails etc.
There is a section on the concrete cover to
the rebar
steel. That is the position of the rebar in from the surface of
the
concrete.
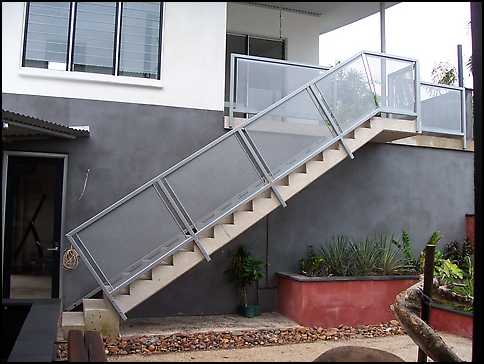 |
| Stair formwork - The completed stair, this straight is the maximum allowed number of steps in one flight, any more and it would have to have a landing in the middle. |
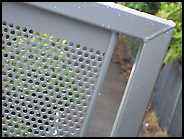 |
| Stair formwork - Handrail detail of the same stair |
Here is one of the almost
finished flights of stairs.
The handrail system
was all aluminium, with perforated aluminium panels.
The
fixing was masonry anchors to the edge of the concrete stairs and
landings.
Back to top
Forming Up The Stair.
For
small one off jobs like this, a mixture of the old and the newer
methods of formwork is mostly used. A mixture of steel props
and
maybe steel "h" frames under the landing, and good old form ply and
timber struts and
braces.
Back to top
Concrete Stairs with a half space landing
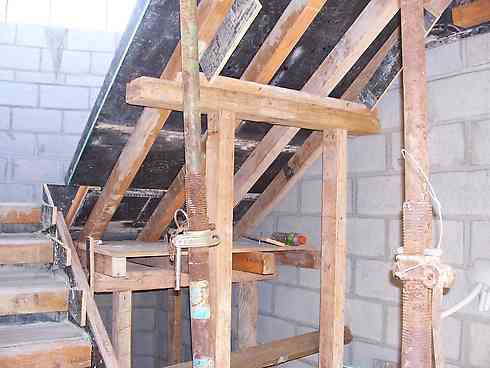 |
| Stair formwork - Stairs with a half space landing. |
Here's a photo of a set of stairs
with a half space landing.
Note that the soffit (underneath
side) ply and supports of the landing run through wider than necessary
for just the concrete, to support the timbers for the upper flight of
the stair.
You can see that all the smaller supports are cut
out of timber, while where possible the steel "Acrow" props have been
used.
 |
| Stair formwork - Same stair |
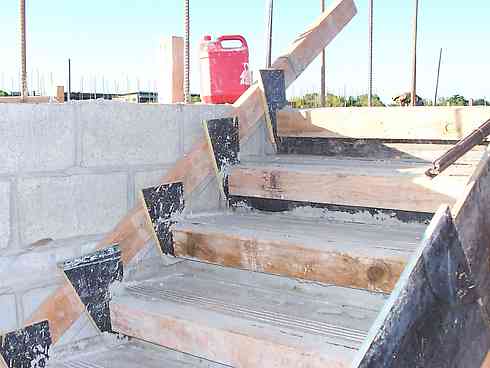
Here you can on the top of the same
concrete stair, that there is no form against the wall. The
concrete touches the core filled blockwork.
Instead
of a side shutter they shoot a timber to the wall with a "Ramset" gun
(powder actuated fastener} and the risers, that are ply with a 100 x 75
timber fixed to them, are attached to the wall timber with ply cleats.
The
right hand
side shutter has had it's timbers and braces back to the wall removed
so that people can start using the stairs.
The formwork will
stay in place at least a week.
A basic principle
of stair formwork is that the treads are not formed, but left open.
A normal good quality concrete mix with a standard slump,
(that is not too wet) will well up slightly under vibration, but it
should not pour out of the bottom in a flood.
As
you can see here, the treads have already been partly finished.
Back to top
Wider Stairs
 |
| Stair formwork - wider stairs showing more strong backs |
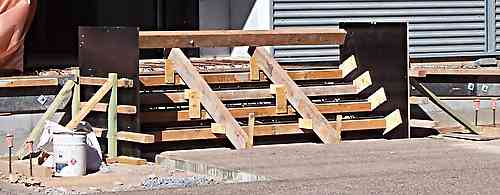
In the photo above, you can the setup used when the stairs are wider, using more than one Strongback.
- There are two strong backs supporting the riser timbers. There is no limit as to how many and how wide the stair can go.
- Notice at the top the carpenter has put in an additional 150 x 100 timber bearer to support the strong backs.
- The riser forms have a 100 x 75 timber supporting the ply
- The risers are hanging off the strong backs with vertical timber hangers. (to hold them up, straight and level.
- The risers also have horizontal braces back to the strong backs, to stop the force of the wet concrete bending
- These timber hangers and braces off the Strongback are alternated, each side of the heavier timber, to stop any tendency for the timber to twist sideways.
- The foot of the strong backs are braced against the already poured concrete paving.
- The side forms are braced at the bottom and top to a heavy timber plate that is supported by steel pickets in the ground.
- Note the edge formwork for the landing walkway slab bolted to the walls. It is going to be poured with the stairs.


