Sheet Metal Roof Flashings
Flashings
are the purpose made pieces of bent and formed sheet metal, usually
made out of the same coil stock as the roof sheeting itself, that are fixed
during the course of the sheeting job. Sometimes before the sheets are
laid (valleys, box gutters), but more often after the main sheets are
laid. They add the final touches to the visual aspect,
and
waterproof the
roof.
Here's
a swift tip. Don't just price the roof iron and
then add a bit extra for the trims. Price them separately and
accurately. I have done heaps of jobs where the trims
cost more than the sheeting. They also took longer to fix too.
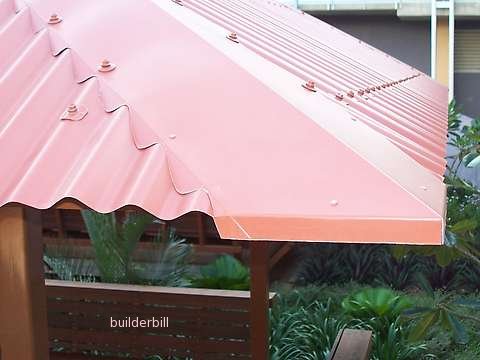 |
| A Colorbond hip flashing. note the difference between the flat surface type screw and the cladding screw. Also note that were there is a need to fix the flashing to the sheeting under then pop rivets have been used to tidy things up. |
Here's
a nicely fitted COLORBOND hip trim to a Custom Orb roof.
You
can see that the main sheeting uses a different screw and washer
combination than the trim. Also at the bottom edge the
roofer
has fixed the trim to the loose ends of the roof sheeting,
(where here is no batten to fix to) with pop rivets.
These
are usually blind rivets, that is ones that are sealed on the ends.
Click here for a detailed page on
back to top
Flashings
are final pieces that trim and weatherproof the roof when the sheeting
is all fixed. Don't treat them casually. They are
vital for
the performance and looks of a good roof.
The
ones shown below are fairly average for our conditions.
I have seen roofers or builders cut
down on the sizes a fair
bit from my suggestions here. Where I have shown a 200 lap,
others use 150. less material equals cheaper, equals more chance of
water penetration.
Depends on roof
the pitch also.
The turn down into the valleys or pans varies
with the
cladding used.
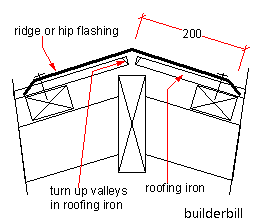 Here
is a sketch of a typical ridge flashing, to a timber pitched roof.
The hip ones are the same, just a touch flatter on any
given roof. Here
is a sketch of a typical ridge flashing, to a timber pitched roof.
The hip ones are the same, just a touch flatter on any
given roof.
MOST important is the turn up right at the top.
The
Sisalation/sarking is not shown on any of these sketches, but it will
be there of course. |
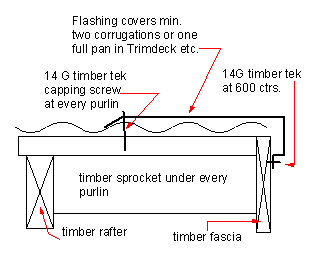 Again
a timber roof, this time the barge flashing at the edge of a gable
roof. In the sketch I have noted it as a timber fascia, but
more correctly the fascia is a horizontal board and the barges are the
ones that go up the slope. Again
a timber roof, this time the barge flashing at the edge of a gable
roof. In the sketch I have noted it as a timber fascia, but
more correctly the fascia is a horizontal board and the barges are the
ones that go up the slope.
I always prefer the "L" shaped
return at edges like this as it gives a good straight sight edge, and a
positive fixing. |
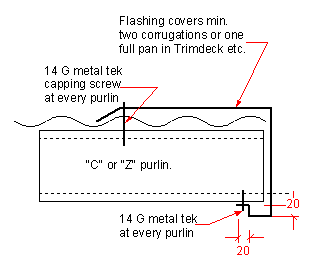 Here's
the same thing again on a steel verandah or carport. the 20mm
x 20mm step is a bit bigger than necessary, but it is as small as the
modern large folding machines can do. If there was a ceiling
underneath, the barge would fit over the battens and the sheeting fit
neatly to the deeper rebate. Here's
the same thing again on a steel verandah or carport. the 20mm
x 20mm step is a bit bigger than necessary, but it is as small as the
modern large folding machines can do. If there was a ceiling
underneath, the barge would fit over the battens and the sheeting fit
neatly to the deeper rebate. |
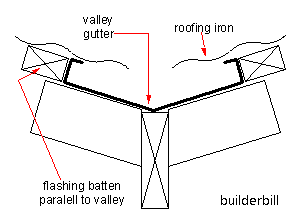 Here's
one of a valley gutter. Here's
one of a valley gutter.
Usually these are made out of thicker
material than the rest of them on the roof.
To try
to get them as deep as possible, the ones shown are sitting directly on
the rafters, or trusses, which are at say 900 centers. so they are usually
of stiffer material to take the greater span.
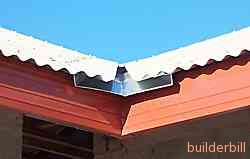
Otherwise
the place where the valley flashing sits would have to have something
to help it span between the rafters, which would in turn reduce the
depth of the valley gutter.
This could be a timber board, or a metal ribbed roof or wall profile. |
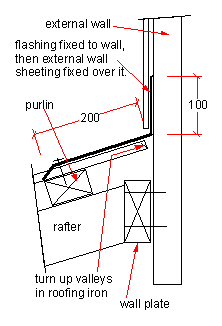 Here's
a top end of a roof where it abuts a wall. In this instance a
stud wall with external cladding. The flashing goes up behind
the external wall cladding. Here's
a top end of a roof where it abuts a wall. In this instance a
stud wall with external cladding. The flashing goes up behind
the external wall cladding.
A similar detail could apply at
a side wall also. That is fix the trim first to the stud work, then run the external cladding over. |
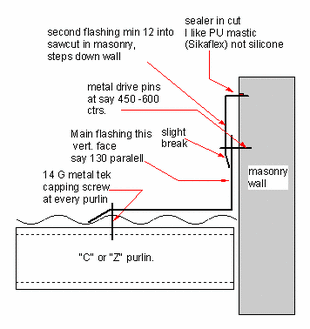 A
roof abutting a masonry wall at the side. Because of the
slope of the roof and the need to step the flashing it is done in two
sections, otherwise if it is a very flat roof, a tapered trim could be used in one piece. A
roof abutting a masonry wall at the side. Because of the
slope of the roof and the need to step the flashing it is done in two
sections, otherwise if it is a very flat roof, a tapered trim could be used in one piece.
The detail of turning the flashing
into a saw cut in the wall is important. I have seen them
fixed straight to the wall with just a silicone seal, but while OK short term, it is asking
for trouble. later on. |
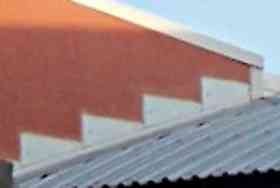 Now
this is a crappy photo! Now
this is a crappy photo!
Still it is quicker than drawing it
out. Here is a shot of trim stepping uphill against a
masonry wall. Start from the bottom with each succeeding one
overlapping the previous one.
You can also see the parapet
wall flashing on the top of the wall. |
 Simple
capping trim for a parapet wall. Simple
capping trim for a parapet wall.
I
like using something like the metal drive pin type fastenings for this
sort of fixing. That is a say 5mm metal plug, that has a metal
nail with it, that when the nail is driven in the plug expands.
There are many similar ones on the market, out of plastic, and they fix OK, but the plastic perishes after a few years exposure. |
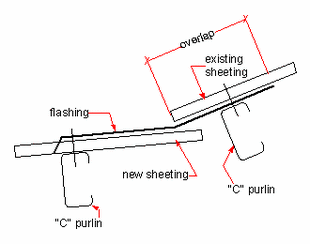 Here's
a join between two roof surfaces at different angles. Quite
often done like this when the bottom one is added at a later date. Here's
a join between two roof surfaces at different angles. Quite
often done like this when the bottom one is added at a later date. |
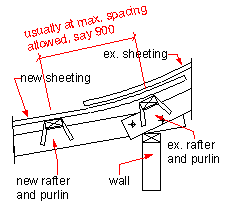 I
have done a lot of extension roofs like this, cutting back the existing
roof at the eaves and adding the new one under the old with plenty of
lap, and inducing a curve to both of them. I
have done a lot of extension roofs like this, cutting back the existing
roof at the eaves and adding the new one under the old with plenty of
lap, and inducing a curve to both of them.
As
shown I leave the batten spacing as wide as possible, otherwise I have
packed up the batten at the middle of the curve. |
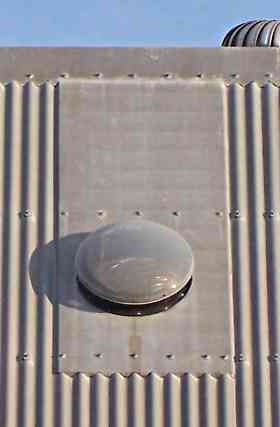 This
is what is commonly called up here a soaker . This
is what is commonly called up here a soaker .
A
soaker
used to be a flashing on the upside of say a chimney, that
went under the roof material. Here we do it like this, We pay
the extra for the material and go over the roof sheeting up the roof
all the way to and under the ridge capping.
This
one has to go past the roof penetration (solar tube light, a poor man's
skylight) and fixes to the next batten down.
Note that on
the sides it turns into the valleys of the sheeting. Having a side lap at the hole at least the same as the sheeting itself. |
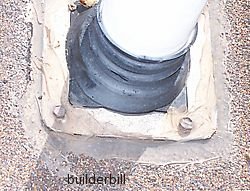 For
smaller penetrations through a roof, like this 50mm vent pipe a Dektite
fitting is usually used. The seal is EPDM
I am not sure what the metal strips are, but they are soft
and easily shaped to the sheeting profile. Again a
crappy photo, but if I get a better one I will swap it. For
smaller penetrations through a roof, like this 50mm vent pipe a Dektite
fitting is usually used. The seal is EPDM
I am not sure what the metal strips are, but they are soft
and easily shaped to the sheeting profile. Again a
crappy photo, but if I get a better one I will swap it. |

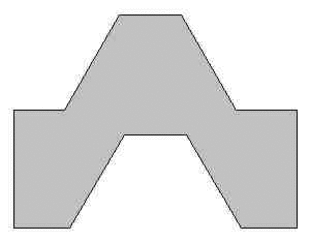 At
the top is a ridge capping scribed over a Trimdek type cladding. At
the top is a ridge capping scribed over a Trimdek type cladding.
To
get the cuts right I lay the ridge flashing in position and hold it
with a couple of screws. I make a template out of a bit of
scrap
trim material and lay the bottom cut out on the sheet ridge and
mark the cut out on the flashing with it. Working along until I
have marked them all.
I
then take the
thing off the roof, into the shade and cut it on a couple of saw
horses. I have to be careful lifting it back onto the roof, as
the stiffness has gone out of it and it is easy to buckle
at this stage.
Top gun roofers would laugh at me doing it that way.
They
cut in position, without templates and invariably get it spot on.
Practice makes perfect.
They do the same with the
hips, all cut in place, and I do the same with a template.
|
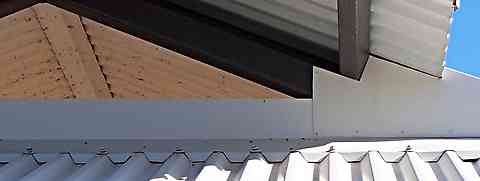 |
| This shows the turn up of a flashing at an open Dutch Gable, but the same detail would be used at any vertical surface. |
Here's
a shot of a Kliplok roof, showing the scribing of the top trim to
the roof sheeting. The flashing itself turns up 100 or so
vertical. In this case the architect has left the Dutch gable
surface open, for ventilation as the roof is covering an open area.
The same flashing is used just like this, when wall cladding
is
added.


 Here
is a sketch of a typical ridge flashing, to a timber pitched roof.
The hip ones are the same, just a touch flatter on any
given roof.
 Again
a timber roof, this time the barge flashing at the edge of a gable
roof. In the sketch I have noted it as a timber fascia, but
more correctly the fascia is a horizontal board and the barges are the
ones that go up the slope.
 Here's
the same thing again on a steel verandah or carport. the 20mm
x 20mm step is a bit bigger than necessary, but it is as small as the
modern large folding machines can do. If there was a ceiling
underneath, the barge would fit over the battens and the sheeting fit
neatly to the deeper rebate.
 Here's
one of a valley gutter.
 Here's
a top end of a roof where it abuts a wall. In this instance a
stud wall with external cladding. The flashing goes up behind
the external wall cladding.
  A
roof abutting a masonry wall at the side. Because of the
slope of the roof and the need to step the flashing it is done in two
sections, otherwise if it is a very flat roof, a tapered trim could be used in one piece.
 Now
this is a crappy photo!
 Simple
capping trim for a parapet wall.
  Here's
a join between two roof surfaces at different angles. Quite
often done like this when the bottom one is added at a later date.
 I
have done a lot of extension roofs like this, cutting back the existing
roof at the eaves and adding the new one under the old with plenty of
lap, and inducing a curve to both of them.
  This
is what is commonly called up here a soaker .
  For
smaller penetrations through a roof, like this 50mm vent pipe a Dektite
fitting is usually used. The seal is EPDM
I am not sure what the metal strips are, but they are soft
and easily shaped to the sheeting profile. Again a
crappy photo, but if I get a better one I will swap it.
 At
the top is a ridge capping scribed over a Trimdek type cladding.